Install Guide
TOOLS NEEDED
Tools you'll need:


Phillips screwdriver
Timber wedges


Power planer
Paint Brush


Cordless drill
Tape measure
utility knife
Combination square
Pencil/marker
Hearing protection


Spirit level
Hammer
Safety glasses
Chisel
Notes:
• These instructions are for installing a door into an existing jamb.
• Hinges and door furniture (handles, latches, locks) are not included.
• Always double-check your measurements before any cutting.
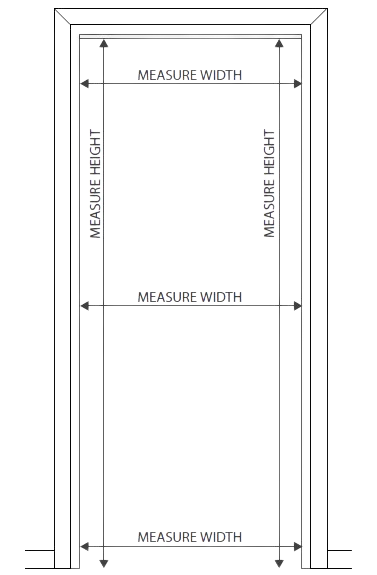
STEP 1. CHECK & MEASURE OPENING
1.1 Measure the width of the door opening in three places — top, middle, and bottom.
1.2 Measure the height of the opening on both the left and right sides of the jamb.
Why this matters: this tells you if the opening is out of square and what size the finished door needs
to be.
STEP 2. TRIM THE DOOR
Calculate your finished door size:
Final door width = Opening width − 10 mm (that’s 5 mm clearance on each side).
Final door height = Opening height − (5 mm + floor clearance).
5 mm = recommended clearance at the top of the door.
Floor clearance depends on flooring (tiles, carpet, timber, etc.).
Important trimming rules:
Maximum of 5 mm can be removed from any single edge of the door and it must be
taken off evenly.Leave ~5 mm between door and jamb on the sides and head.
Bottom gap will vary depending on floor finish.
Most openings aren’t perfect, so light trimming is normal.
Process:
2.1 Confirm door orientation. The manufactured bottom edge is usually marked/date-
stamped.
2.2 Mark trim lines using a combination square and pencil.
2.3 Clamp the door securely.
2.4 Plane back to the line using a power planer. Do not cut past your mark.
Formula for trimming door:
Opening Width - 6mm (6mm is the recommended clearance of 3mm on the left and 3mm
on the right of the door)
Opening Height - 3mm + flooring clearance (3mm is the recommended clearance at the
top of the door. The floor clearance will vary depending on the floor covering and will need
to be determined by the installer).
STEP 3. POSITION THE DOOR IN THE OPENING
3.1 Lift/place the door into the jamb opening. To minimise the risk of injury to yourself and others, it is recommended that two people lift and position the door into the opening.
3.2 Use timber wedges/packers under the door and at the sides to hold it in position.
3.3 Check gaps:
5 mm at the head
5 mm down each side
Bottom clearance suits your floor
If the gaps aren’t consistent, take the door back out and trim again.
Hinge quantity guide:
2 hinges — lightweight internal hollow core doors only.
3 hinges — solid / semi-solid internal doors up to 2040 x 820 mm.
4 hinges — larger or heavier doors, and feature/entry doors.
STEP 4. MARK & CHISEL FOR HINGES
4.1 With the door temporarily wedged in the correct position, mark hinge positions on the jamb.
Mark all the hinge positions onto the face of the door.
4.2 Remove door from opening and place securely on its side. Transfer those hinge positions to the
edge of the door.
4.3 Hold each hinge leaf on the mark, trace around it with pencil.
4.4 Lightly score that outline with a sharp trimming knife. Always cut away from your other hand.
4.5 Using a chisel and hammer, remove a shallow rebate (no deeper than the hinge leaf thickness).
4.6 Clean up and sand for a flat smooth surface.
STEP 5. FIX HINGES TO THE DOOR
5.1 Position the hinge in the rebate.
5.2 Pre-drill pilot holes for each screw (prevents splitting and keeps hinge aligned).
5.3 Drive screws to secure the hinge to the door edge.
5.4 Repeat for all hinges.
STEP 6. SEAL THE DOOR - VERY IMPORTANT
Before you hang the door:
Seal the top and bottom edges of the door. This protects against moisture intake and swelling.
Use a quality sealer/primer system suitable for the final finish (paint / clear coat).
See Design Doors Syd warranty for details
STEP 7. HANG THE DOOR
7.1 Stand the door back in the opening on wedges so the hinges line up with the hinge locations on the jamb.
7.2 Screw the hinges to the jamb.
7.3 Open and close the door to confirm that it swings freely, doesn’t scrape, and sits evenly in the frame.
STEP 8. INSTALL DOOR HANDLE
Now is the time to install your selected door furniture. Follow the manufacturer’s instructions
CARE & FINISHING NOTES ONGOING CARE:
All six faces of the door (front, back, both long edges, top, bottom) must be sealed and maintained.
For external or moisture-exposed locations, use light/neutral colours with high light reflectance to reduce heat absorption and minimise bowing or twisting. Dark colours can overheat a door and may void warranty.
Wipe doors with a damp cloth only. Avoid harsh cleaners or abrasive pads.
Lightly oil hinges and hardware occasionally to maintain smooth movement.
Overhead Protection
Timber doors are naturally affected by sunlight, temperature, and moisture. To ensure long-term performance and stability, all external and entry doors must be installed in a sheltered area that offers suitable overhead cover.
The required amount of protection depends on your home’s orientation and local climate. In general:
Northern and western exposures require deeper overhead coverage to reduce heat and moisture exposure.
Southern and eastern aspects typically need less coverage but should still be protected from rain and direct sun.
As a general rule, the minimum projection of the overhead structure (such as an eave, awning, or porch) should be at least equal to the height of the door frame from the base of the sill to the underside of the cover. Homes in tropical or coastal areas may require additional overhang due to higher humidity and UV exposure.
Doors finished in dark colours absorb more heat, increasing the risk of warping or bowing. For all exterior installations, we strongly recommend light, reflective colours to minimise heat absorption and extend the life of the door finish